Authorized dealer · Contractors‑Tools.com
PART NO. 46-D8872 | LT8-300LP
David White LT8-300LP Universal Level-Transit with Laser Plummet
The five-minute level-transit for leveling, angles and plumb, set up over your point with a laser dot, not a plumb bob.
Order by 12 noon Central and it ships the same day. Price is live from the store.
Optical plummet instead: LT8-300P Instrument · LT8-300P K1 kit · LT8-300P K2 kit

David White LT8-300LP Universal Level-Transit with Laser Plummet — What’s in the box
- 46-D8872 (LT8-300LP) Universal Level-TransitWith laser plummet, horizontal circle, vertical arc, verniers and stadia reticle
- Plumb bob
- Rain hood
- Objective lens cap
- Heavy-duty hard carrying caseThe guide says to store and transport it only in the case
- Owner's manualAlso linked below as a PDF
- 2-year warrantyOn the instrument
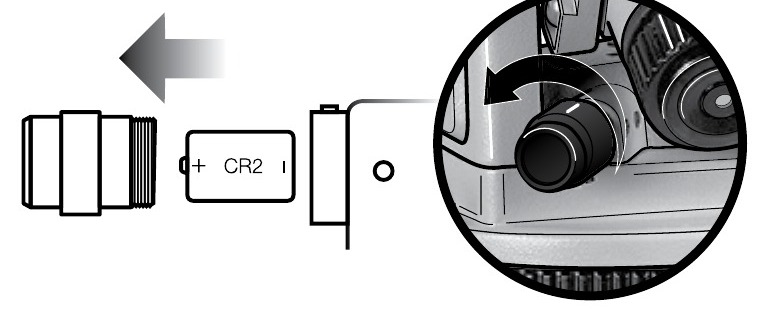
The laser plummet runs on one CR2 lithium battery.
A five-minute level-transit built for the jobsite
Rugged and Dependability makes this David White LT8-300LP five-minute instrument the first choice for almost every horizontal and vertical sighting application in construction. The sleek, compact, 26x telescope is engineered to protect against dirt, damage and costly repairs. The horizontal axis features a Trunnion Design for maximum rigidity. Within the protection of the rugged base, the wide-stance ball bearing center guarantees you smooth movement and superior alignment control. The level transit is lined up over a reference point by using a laser plummet, assuring you of precise positioning every time.
Powerful 26X optics
A sharp image magnified 26 times, internal rack-and-pinion focusing from 6 feet to infinity, with a detachable sunshade.
3/16 in at 150 ft
Leveling accuracy within 3/16 in at 150 ft (5 mm at 45 m), with a range of up to 400 feet.
Level and transit in one
The telescope rotates 360° and tilts 45° up and down: lock it for leveling, open the locks for vertical sightings.
Horizontal circle and vernier
Lock the circle, read degrees and 5-minute fractions, and fine-tune with the horizontal tangent.
Vertical arc and vernier
Vertical angles to 45° up or down, read to 5 minutes, with its own clamp and tangent.
Laser plummet
A laser dot through the center of the instrument puts you over the point; no plumb bob to steady.
What the LT8-300LP is used for
David White designed the LT8-300 series for determining and checking precise horizontal partitions, and for measuring heights, distances and angles.
Medium range leveling
Turning angles, establishing 90° reference lines
Determining vertical angles, basic grade work
Checking angles, alignment and plumb
Anchor bolt alignment
Gravity flow pipe laser set-up
Aligning forms
Aligning walls
Set up over a point with a laser dot, not a plumb bob
- Line up the tripod over the reference point. Set it firmly, with the points well into the ground.
- Remove the plumb bob hanger from the center stud of the tripod.
- Attach the instrument to the tripod and level it.
- Turn the laser plummet on. Press and release the ON switch; a laser point projects through the center of the instrument to the reference point.
- Line up the laser point with the reference point. If needed, loosen the tripod center stud and slide the instrument side to side.
The laser plummet takes one CR2 lithium battery. Turn the plummet off before you change it, and take the battery out if the instrument will sit unused for a long time. When the battery weakens, the dot gets dimmer.
LT8-300LP 46-D8872 technical data
| Range | Up to 400 ft |
|---|---|
| Accuracy | Within 3/16 in at 150 ft (5 mm at 45 m) |
| Telescope length | 8-1/2 in (216 mm) |
| Minimum focus | 6 ft (1.8 m) |
| Aperture | 1.257 in (32 mm) |
| Power | 26X |
| Field of view | 1 ft 9 in at 100 ft (54 cm at 30 m) |
| Number of lenses | 8 |
| Stadia ratio | 1:100 |
| Horizontal circle diameter | 4-5/8 in (117 mm) |
| Horizontal circle graduations | Each 1°, numbered each 10°, 0-90-0° |
| Horizontal vernier | Double direct to 5 min. |
| Vertical arc graduations | Each 1°, numbered each 10°, 45-0-45° |
| Vertical vernier | Double direct to 5 min. |
| Center | Wide-stance dual row ball bearings |
| Level vial accuracy | 110-120 sec. per 2 mm |
| Plate vial accuracy | 360 sec. per 2.5 mm |
| Plummet | Laser plummet, one CR2 lithium battery |
| Tripod | Use a heavy-duty 5/8-11 tripod |
| Weight (instrument only) | 9.5 lb (4.31 kg) |
| David White part number | 46-D8872 |
| Warranty | 2 years |
From the David White LT8-300 Series owner’s guide.
Instrument only, or ready to work with tripod and rod
Every LT8-300P and LT8-300LP comes as the instrument alone or as a K1 (tenths rod) or K2 (inches rod) kit with the SitePRO ALQR20 tripod. Prices are live.
| Package | Part number | Plummet | Tripod and rod | Price |
|---|---|---|---|---|
| LT8-300P instrument | 46-D8871 (store no. 44-8871) | Optical | – | $1,255.00 |
| LT8-300P K1 kit | 44-8871-K1 | Optical | ALQR20 tripod + 15 ft tenths rod | $1,355.00 |
| LT8-300P K2 kit | 44-8871-K2 | Optical | ALQR20 tripod + 15 ft inches rod | $1,355.00 |
| LT8-300LP instrument ← this page | 46-D8872 | Laser | – | $1,313.00 |
| LT8-300LP K1 kit | 46-D8872-K1 | Laser | ALQR20 tripod + 15 ft tenths rod | $1,413.00 |
| LT8-300LP K2 kit | 46-D8872-K2 | Laser | ALQR20 tripod + 15 ft inches rod | $1,413.00 |
LT8-300 series: optical plummet, laser plummet or line transfer
The LT8-300 family shares the same 26X optics, 3/16 in at 150 ft accuracy and 400 ft range. Pick the instrument, then the way you want to set it over a point. Prices are live.
Swipe the table sideways on a phone.
| LT8-300P | LT8-300LP | LT8-300LTU | LT8-300LTU | |
|---|---|---|---|---|
| Instrument | Universal level‑transit | Universal level‑transit | Line transfer unit | Line transfer unit |
| Vertical arc | 45° up and down | 45° up and down | Telescope sights straight down | Telescope sights straight down |
| Set up over a point | Optical plummet | Laser plummet | Plumb bob | Laser plummet |
| Part number | 46-D8871 (store no. 44-8871) | 46-D8872 | 46-D8877 | 46-D8879 |
| Price | $1,255.00 | $1,313.00 | $1,398.00 | $1,398.00 |
The line transfer units are specialty transits for lining up pipe lasers from the surface; open their pages for their own specifications.
LT8-300LP parts, numbered
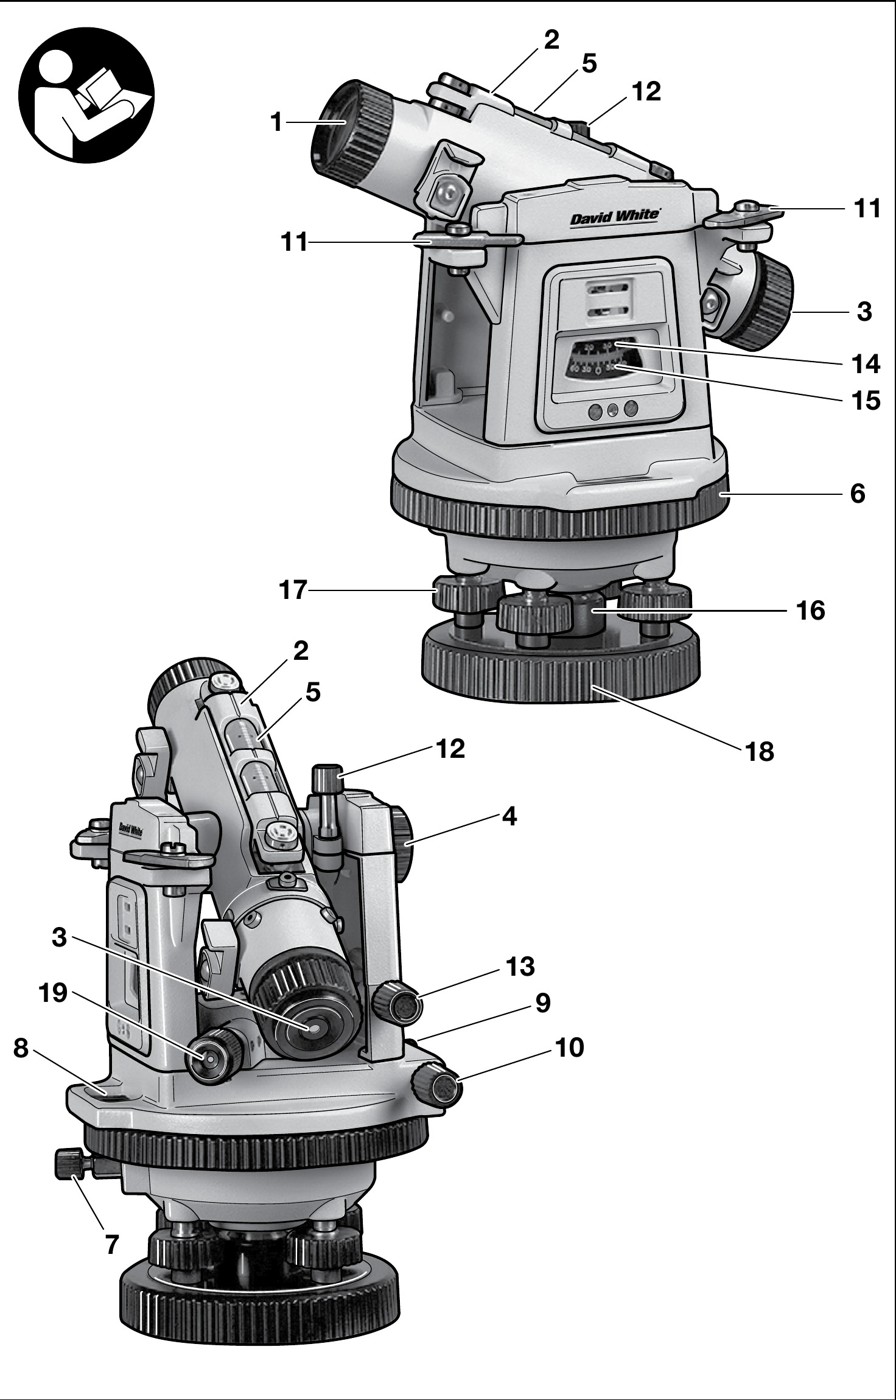
Match the numbers on the diagram to the parts below. Part 19 is the laser plummet (its battery cap and ON switch).
- 1Telescope objective lens
- 2Sighting notches
- 3Eyepiece
- 4Focusing knob
- 5Instrument level vial levers (2)
- 6Horizontal circle
- 7Horizontal circle lock
- 8Horizontal vernier
- 9Horizontal clamp
- 10Horizontal tangent
- 11Telescope lock
- 12Vertical clamp
- 13Vertical tangent circle
- 14Vertical arc
- 15Vertical vernier
- 16Shifting center
- 17Four leveling screws
- 185/8-11 thread base
- 19Plummet (laser plummet)
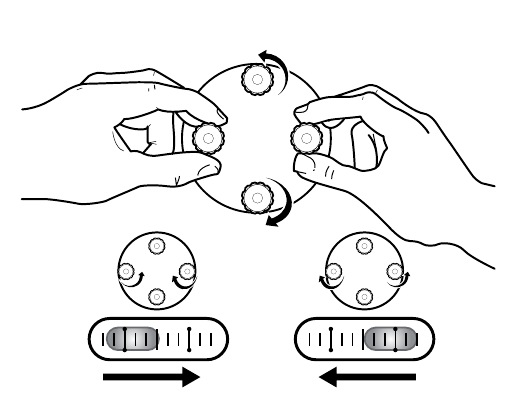
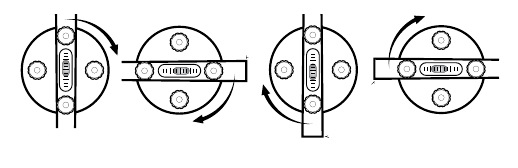
Thumbs in, thumbs out: leveling in four moves
Keeping the bubble centered through a full 360 degree turn of the telescope is the most important step in preparing the instrument. Do not touch the tripod while you level.
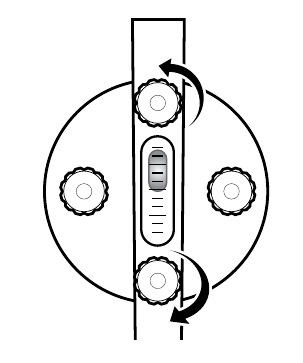
- Line the telescope up over one pair of leveling screws.
- Turn both screws at the same time with your thumbs, toward each other or away from each other, until the bubble centers. The direction your left thumb moves is the direction the bubble moves.
- Rotate the telescope 90 degrees over the second pair of screws and repeat.
- Final check: rotate over each of the four leveling points and confirm the bubble stays centered.
How to read the horizontal circle, vertical arc and vernier
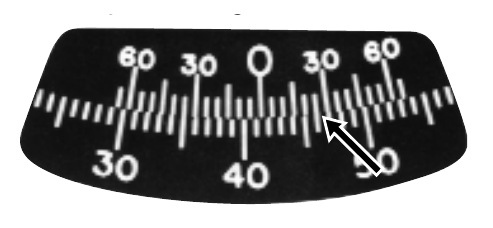
The 360 degree horizontal circle is split into four quadrants of 0 to 90 degrees, marked in degrees and numbered every 10. On the level-transit, the vertical arc is a degree scale too, numbered every 10 degrees to 45 degrees up and down. Each vernier divides a degree into 12 parts of 5 minutes, and you read it in the same direction as the degree scale.
1. Exact degree
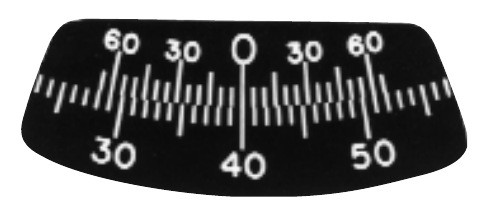
2. Degrees and minutes
3. Reading to the left
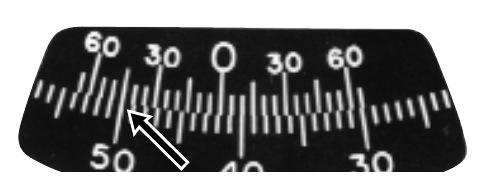
The vertical arc and its vernier read the same way. Leveling: keep both telescope lock levers closed. Vertical sightings: open them, then use the vertical clamp and tangent.
Sight it, focus it, lock it on
- Aim and sight through the notches. Aim the telescope at the object and sight first through the notches on the top of the level vial.
- Focus the crosshairs, then the object. Look through the telescope and focus the crosshairs with the eyepiece, then bring the object into focus with the focusing knob.
- Lock on and fine-tune. Rotate the instrument until the crosshairs are on or near the target, tighten the horizontal clamp, and make final settings with the tangent to bring the crosshairs exactly on point.
When sighting through the telescope, keep both eyes open. You will find that this eliminates squinting, will not tire your eyes and gives the best view through the telescope. Remember to avoid touching the tripod while sighting.
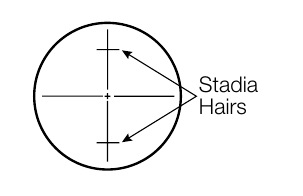
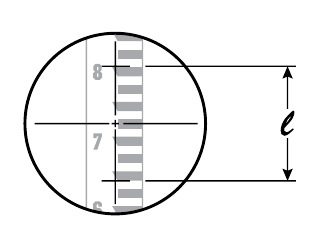
Stadia hairs: measure distance without a tape
All David White Universal instruments have a glass stadia reticle with two additional horizontal lines for use in determining distance. Stadia ratio is 1:100, which indicates that the rod measurement between the upper and lower stadia lines multiplied by 100 is the distance from the center of the instrument to the rod: L = 100 × l.
Check the accuracy before you rely on it
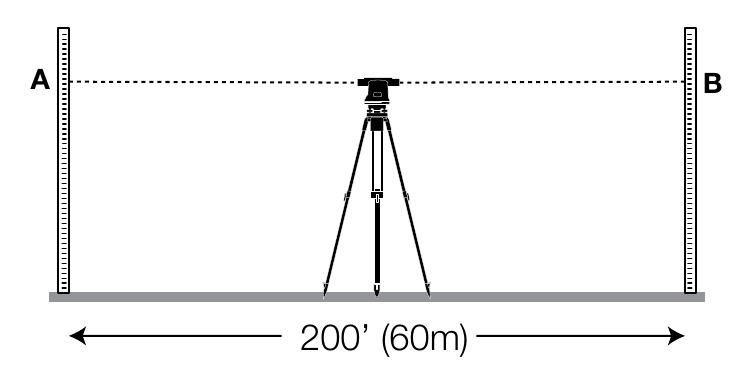
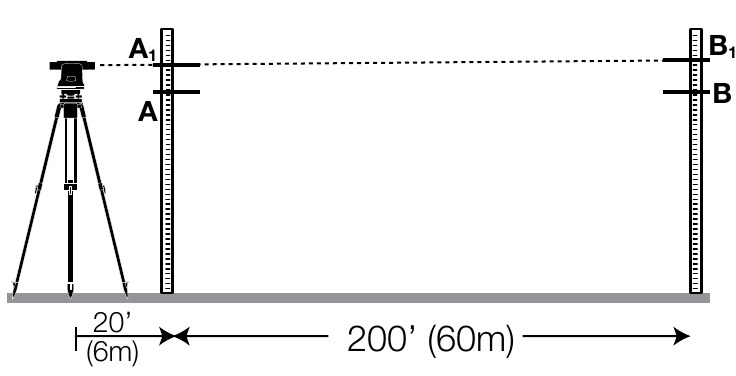
Every instrument is inspected twice for accuracy before it leaves the factory, but shipping is rough. David White recommends this check before first use, and after any heavy knock.
- Pick a level area about 200 ft (60 m) long. Set two matching level rods, faces toward each other, about 200 ft apart.
- Set up midway. Level the instrument exactly the same distance from each rod, read both rods at the crosshair and record the difference.
- Move to about 20 ft (6 m) from one rod, in line with both rods, level again and read both rods.
- Compare. A − A1 should equal B − B1. The difference between them is the instrument error at 200 ft.
Keep it accurate
Check it, every time
Instruments leave the factory adjusted, but it is your job to check the adjustment before you use one, and after any hard knock. David White is not responsible for errors from an instrument that is out of adjustment.
Case and carry
Transport it in the supplied case. Carry the instrument off the tripod; if you must carry it on the tripod, hold it as upright as you can, in front of you, never flat over your shoulder.
Keep it clean and dry
Protect it from moisture, direct sun and big temperature swings; do not leave it in a vehicle. Let it adjust to the air before you use it.
Annual service
Have it cleaned, lubricated, checked and adjusted by a qualified instrument repair station or the manufacturer at least once a year.
David White LT8-300LP 46-D8872: your questions
What is a level-transit?
A level-transit is a builder’s level whose telescope also tilts up and down, so one instrument does leveling, horizontal angles and vertical angles. The David White LT8-300LP tilts 45 degrees up and down and turns a full 360 degrees.
Is there a kit with a tripod and rod?
Yes. The LT8-300LP comes as a K1 kit with a 15 ft tenths rod or a K2 kit with a 15 ft inches rod, both with the SitePRO ALQR20 heavy-duty aluminum tripod. See the package table on this page.
What is the difference between the LT8-300P and the LT8-300LP?
The way they set up over a point. The LT8-300P (46-D8871, our store no. 44-8871) has an optical plummet: you sight down through an eyepiece. The LT8-300LP (46-D8872) has a laser plummet that projects a dot to the point and runs on one CR2 battery. The optics, accuracy, range and circles are the same.
How accurate is the LT8-300LP, and how far does it reach?
Leveling accuracy is within 3/16 in at 150 ft (5 mm at 45 m), with a range of up to 400 ft. The telescope has 26X power and a 1.257 in aperture.
How do I set the LT8-300LP up over a point?
Line the tripod up over the point, remove the plumb bob hanger, attach and level the instrument, then press the ON switch and line the laser dot up with the point. If needed, loosen the tripod center stud and slide the instrument side to side.
What battery does it need?
The LT8-300LP laser plummet uses one CR2 lithium battery. Turn the plummet off before changing it.
How do I check the accuracy?
Set two level rods about 200 ft apart. Read both from midway between them, then from about 20 ft from one rod. A minus A1 should equal B minus B1; the difference is the instrument error at 200 ft. Have any correction done by an authorized service technician.
How do I level it?
Line the telescope up over one pair of leveling screws and turn both together, thumbs in or thumbs out, until the bubble centers. Rotate 90 degrees over the other pair and repeat, then check all four positions. Do not overtighten the screws.
How do I measure distance with the stadia hairs?
Read the length of a level rod between the two stadia hairs and multiply by 100. A rod interval of 1.20 ft is a distance of 120 ft.
What tripod do I need?
David White specifies a heavy-duty 5/8-11 tripod. A tripod is not included in this package.
What is in the box?
The LT8-300LP level-transit, plumb bob, rain hood, objective lens cap, heavy-duty hard carrying case and the owner’s manual, with a 2-year warranty.
What is the part number?
David White part number 46-D8872.
What warranty does it have?
David White laser tools and optical instruments carry a 2-year limited warranty from the date of purchase. Accessory items carry a 90-day limited warranty.
Owner’s guide and parts diagram
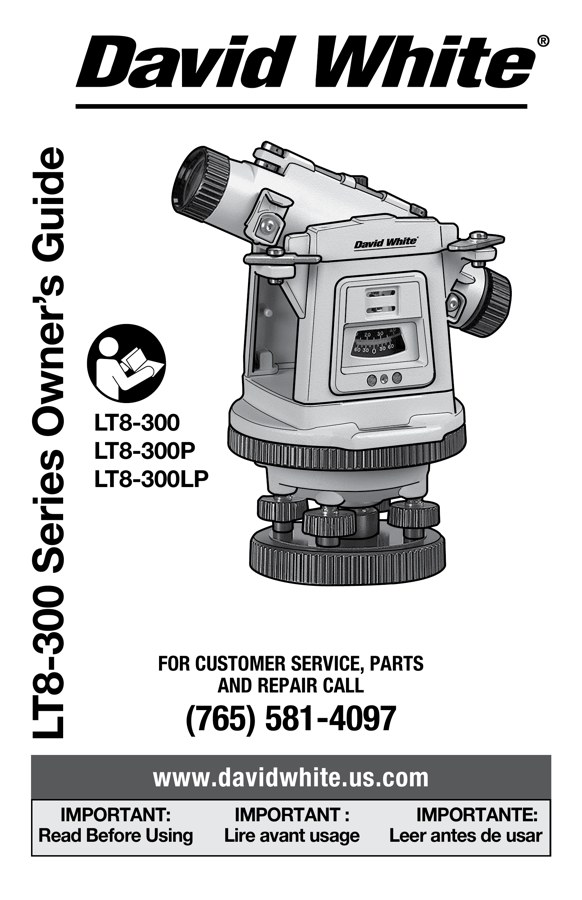
David White LT8-300 Series Owner’s Guide (PDF)
The full guide for the LT8-300, LT8-300P and LT8-300LP: safety, parts, plummet set-up, leveling, circle and arc, stadia, accuracy check, care and warranty.
Download the guide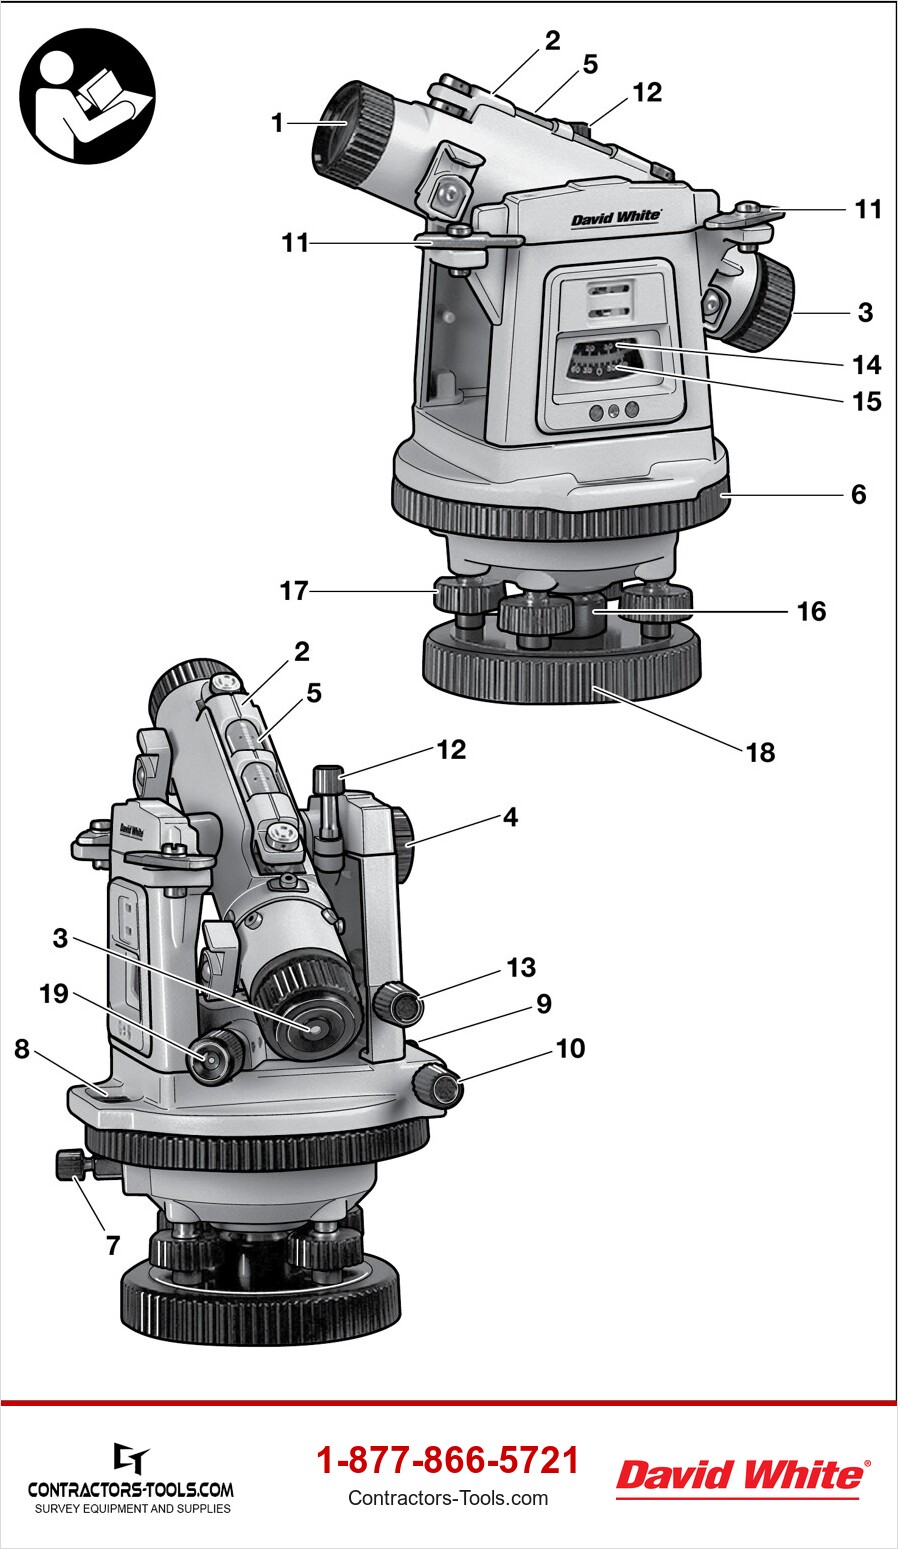
LT8-300 Series Parts Diagram (JPG)
The guide’s numbered parts drawing, front and back views, as one image you can print or keep on your phone for the jobsite.
Download the parts diagram